1

Introduction to Productivity, Flexibility and Team Work

Increase your Productivity

Schedule your weekly tasks, meetings, courses or activities!

Increase your Flexibility

Access your files from any computer, tablet or phone!

Work as a Team

Edit together in real-time with easy sharing, and use comments, suggestions, and action items to keep things moving. Or use @-mentions to pull relevant people, files, and events into your online files for rich collaboration.

Important Links


17.10.2022 – Introduction to CAD Software

Why do I need CAD Software?

  • Computer-Aided Design (CAD) is the cornerstone of how you design and build things. It allows the user to digitally create, visualise, and simulate 2D or 3D models of real-world products before it is being manufactured.
  • CAD models allow users to iterate and optimize designs to meet design intent.
  • The use of CAD software facilitates the testing of real-world conditions, loads, and constraints, which increases the quality of the product.
  • CAD software helps to explore ideas and visualise the concept.
  • Improve the quality, precision of the design, and communication in the design process.
  • Analyse real-world scenarios by computer-aided analysis
  • Create a database for product development and manufacturing.

Some Practical Applications of CAD Software

Source: https://learnsolidworks.com/
Source: https://automation.siemens.com/
Source: https://leocad.org/

Automobile parts can be modelled, visualised, revised, and improved on the screen before being manufactured.

Electrical schematics, control circuit diagrams, PCBs, and integrated circuits (ICs)  can be designed and developed with ECAD software 

With CAD software, architects can visualise and simulate their entire project using real-world parameters, without needing to build any physical structuress or models. 

What CAD software do I need?

Something free

  • FreeCAD
  •  TinkerCAD
  • Fusion 360
  • Onshape
  • Solid Edge
  • Blender
  • SketchUp

My design goes with me wherever I go (cloud-based)

  • Onshape
  • TinkerCAD
  • AutoCAD Web
  • SelfCAD
  • Vectary
  • SketchUp

Something more advanced and professional

  • AutoCAD
  • Autodesk Inventor
  • SolidWorks
  • Fusion 360
  • Solid Edge
  • CATIA
  • Onshape
  • Shapr3D
  • Creo

Windows OS

  • AutoCAD
  • Autodesk Inventor
  • Solidworks
  • Fusion 360
  • CATIA
  • Creo
  • Solid Edge
  • Shapr3D
  • Blender

Linux OS

  • NX Advanced Designer
  • Blender

MacOS

  • AutoCAD
  • Autodesk Inventor
  • Fusion 360
  • Shapr3D
  • Blender
  • NX Advanced Designer

iOS, Android

  • AutoCAD
  • Autodesk Inventor
  • Shapr3D

Where can I learn CAD?

  1. Coursera:  https://coursera.org/courses?query=cad
  2. Udemy:  https://udemy.com/topic/autocad/
  3. MyCADSite:  https://mycadsite.com/
  4. Skill Share:    https://skillshare.com/search?query=solidworks
  5. CAD-Tutorials.de:  https://cad-tutorials.de/
  6. Youtube:  https://youtube.com/watch?v=cAgpDFTHxpY
  7. CADTutor:  http://cadtutor.net/
  8. PTC Training:  https://ptc.com/en/ptc-university/training-catalogs
  9. Autodesk Tinkercad: https://tinkercad.com/


Introduction to Python

Slides by CPS on Python


Short introduction to Python with some first examples and a coding convention. 

Why should you consider learning Python

  • Python is the most popular programming language in the world with a popularity of 28%.
  • It is easier to learn than many other programming languages.
  • Python is very readable due to its structure. Thus, bugs can usually be found and fixed quickly.
  • Python can be both procedural and object-oriented, which makes it very versatile.
  • There is a large number of software libraries. On python package index, PyPI, over 400,000 packages can be found. And the most important ones can be downloaded quickly and easily using pip.
  • Python and almost all Python software libraries are available for free on the Internet.
https://de.statista.com/statistik/daten/studie/678732/umfrage/beliebteste-programmiersprachen-weltweit-laut-pypl-index/

What Python can be used for

  • Data Science is one of the most popular application areas of Python. Here, not only the complete data analysis but also the visualization will be implemented in Python. Generally, software libraries such as Numpy, Matplotlib and Pandas are used for this purpose.


  • Machine learning is another very popular area. Python can be used for supervised, unsupervised and reinforcement learning. Libraries such as TensorFlow, Keras, PyTorch or scikit-learn are used for this purpose.

Furthermore, Python can be used for all kinds of general purpose programs, such as app development, GUI design, web development and in many other areas. In addition, programs with Python interfaces can be automated through a Python program, for example simulation programs.

Practical example of Python in academia

Especially during the time as a student it is good to have a tool with which you can validate your hypotheses or perform the calculations by the computer. Thus, programs can be written with which problems in physics, chemistry or other tasks can be simulated and subsequently the simulation data can be plotted or even videos can be generated.


Important links


Understanding the basics of privacy

Important Articles

Companies like Google collect and process your data

Google collects your data from many different sources. Here are some examples:

  • Gmail: Google can read and store information from every email you write and receive, including in the spam, draft, and trash folders.
  • Google Maps: Google saves every location you search, in addition to all the places you physically visit with your devices, even if you aren’t logged in. Are you using Waze instead? Google owns that too. The ubiquity of phones and our constant use of them makes them almost like tracking devices we carry around willingly.
  • Android devices: Because Android phones and tablets run on an operating system built by Google, the company can track which ads you’re shown while using your phone. Google also knows what time, down to the second, you open each app.
  • Google apps: The Google Play store records all your searches and downloads, as well as any rewards cards used. Google also tracks which articles you’ve read through Google News.
  • YouTube: Google acquired YouTube back in 2006. When you’re using YouTube, Google tracks your search history, your watch history, how long you spend watching videos, and all your comments and likes or dislikes.
  • Google Assistant: Every request you make and every question you pose is recorded — you can even listen to the audio playback.
  • G Suite: Your calendar shows where you’ll be and when, and Google Hangouts saves all of your conversations.

If you are interessted in which data Google has collected about you, test Google Takeout.

Recommendations: Browser, Search Engine & Online Docs

In our digital age, we have to be aware of the data collection strategies of all services that we use. However, often, alternatives  developed by the open-source community exist. Here are some recommendations:

Recommendations: Messenger & Repositories

  • I personally recommend: Nextcloud’s Talk App.
  • Setup your own repo server using, e.g., Gitea or Gitey.

Final remarks: Stay sensitive to what happens to your data. Nothing is for free.


How to install Python and PyCharm

This tutorial explains how to install the basic Python environment for the Lecture Maschine Learning. This course requires a Python version >= 3.8 and PyCharm as IDE. In case you are using another operating system you can find some links at the end of this wiki post.

Download and Installation of Python

To program with Python you need a current Python version, which can be downloaded from the following website: Python. Basically every version after 3.8 can be used, quite new versions can still have bugs now and then, furthermore some packages are not yet transferred to the newest version, therefore 3.9 is recommended.

After the download, the program must now be installed. It is important that Python is added to the PATH, otherwise this step must be done manually. This is accomplished by selecting the “Add Python 3.9 to PATH” checkbox. Now Python is installed and the IDE “PyCharm” can be downloaded. 

Installation of PyCharm

To install PyCharm visit the jetbrains website and follow the instructions. We recommend the Professional version, to get the license for it you need to create an account on Jetbrains and log in to the program after the installation. 

Links


CoppeliaSim Tutorial

This tutorial describes the usage of the program CoppeliaSim. In particular, the use of the software in the context of the course “Cyber-Physical-Systems” is discussed.

Download and setup of the program

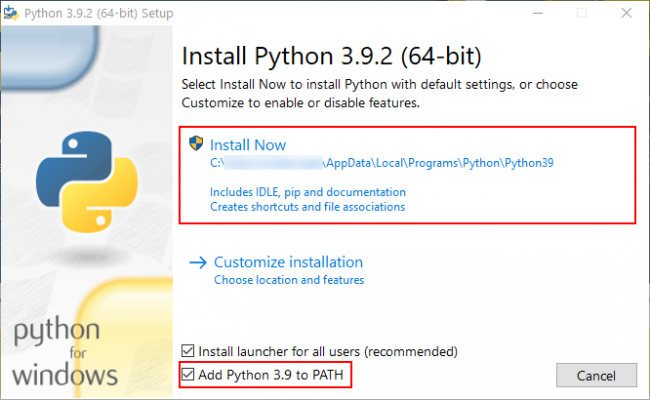
CoppeliaSim can be downloaded from this website. Furthermore, the Python package “msgpack” must be downloaded via pip. Depending on your operating system, different steps are required after the installation.

Windows 10

For Windows 10, no further installation steps are necessary. However, to use the B0-based remote API, some .dll files must be available in the working directory. These can be found in the installation folder of CoppeliaSim. To shorten the search for the files, you can find all the required files in the GitHub project linked below.

Ubuntu 20.04

Before CoppeliaSim can be started, dependencies for the BlueZero API have to be installed. To accomplish that follow the instructions bellow.

Bildschirmfoto von 2021-11-16 16-53-35

In contrast to Windows, CoppeliaSim must be started from the terminal on Ubuntu. To do this, right-click on the unpacked folder and select the option “Open in Terminal”. Then enter the following command “./coppeliaSim.sh”. After confirming with the Enter key, CoppeliaSim starts. To use the B0-based remote API, the file “libb0.so” must be available in the working directory. For some simulations, additional files must be added in the same directory, these can also be found in the GitHub project linked below.

CoppeliaSim and B0-based remote API – Python Client

As described above, depending on the operating system, .dll and .so files need to be added to the workspace. Besides the operating system specific files, the Python scripts “b0.py” and “b0RemoteApi.py” must be present in the working directory. These files can be found in the installation folder or in the GitHub project. For the task of the course, the following two applications are most important: actuation, sensing. Sample code for actuation and sensing can also be found in the GitHub project. In the following section, their application is briefly discussed. 

Actuation

Using the API, Two movement modes are implemented in the provided scene “scene_with_pandas.ttt”. These are used with the method “simxCallScriptFunction” in Python because they are programmed as a function in the simulation file. The following modes are available:

  • – pts: In this mode, the angular positions of the joints and the corresponding time are passed to the simulation as a list (all intermediate points are interpolated). This mode is important for control tasks and if the inverse and forward kinematics have been developed by the user.
  • mov: In the “mov”-mode, the positions and speeds of intermediate points are transferred to the simulation. The inverse kinematics of Reflexxes Motion Library type II or IV is used in this mode.

Sensing

At the beginning, the object handles of the observed objects must be determined, this is done with the help of the method “simxGetObjectHandle”. To execute this method you need a so-called topic, more about this down below. Since “simxGetObjectHandle” only needs to be executed once, and only at the beginning or before the simulation, the topic “simxServiceCall” is used.

Afterwards, the joint angles or joint positions can be streamed with the help of the method “simxGetJointPosition” and the position of the end effector with “simxGetObjectPosition”. To achieve this, a callback function is needed for each angle or for the coordinates (one for each xyz triplet). These callback functions are called cyclically and can be used, for example, to store the angles in an array. Finally, it must be noted that the sensor data should always be saved with their time, otherwise no meaningful calculations or diagrams can be made.

As with the actuation, sample codes are available in the GitHub project.

Links


Getting started with LEGO MINDSTORMS Education EV3

What can you do with the LEGO robot sets?

The LEGO Mindstorms Education EV3 sets can be used in different scenarios. They offer a quick and easy introduction into robot control, motion planning and visual navigation from depth images with Python. One can assemble the robots in various ways with different sensors and motors depending on the desired task. 

For more information go to Robot LEGO Robotics EV3 Dev and to https://pypi.org/project/python-ev3dev2/ .

Prerequisites

First of all a development set is necessary. At the chair of Cyber-Physical Systems we have five sets available for students. The implementation of the python code and connection to the EV3 can be done with Visual Studio Code and the extension LEGO MINDSTORMS EV3 MicroPython. The EV3 bricks are equipped with a micro-SD card on which the Micropython Image is installed. A more detailed installation guide is provided on GitHub.

Example – Motor control

In the following is an example python code to control a motor with the EV3. At the beginning the motor has to be initialized with the corresponding port (line 8). There are two different ways to control a motor. First, one can set a desired acceleration and target position to run the motor (line 11). Or one can set the desired acceleration and let the motor run until it is stopped by a command (line 17-23). 

Demo

If you want to get the python code or if you are interested in other example codes go to our GitHub repository or to this repository: https://github.com/bittner/lego-mindstorms-ev3-comparison#inspiration-for-lego-ev3-robots

Simulation Tools

You may also build your LEGO robot model in a simulation tool and test your Python algorithms. Here is a list of projects:

Here is a list of 3D Modelling Tools for LEGO systems:

Building a Cyber-Physical-System (CPS)

A CPS combines the predictions or commands of computer simulations (see the section on Simulation Tools) and offers a real-time visualization of the real system and the environment. 

Such a CPS can also be developed with our LEGO Ev3 robots. Current sensor measurements can be communicated in real-time to a simulation and visualization tool via bluethooth or wifi connections. Here is a collection of relevant resources: